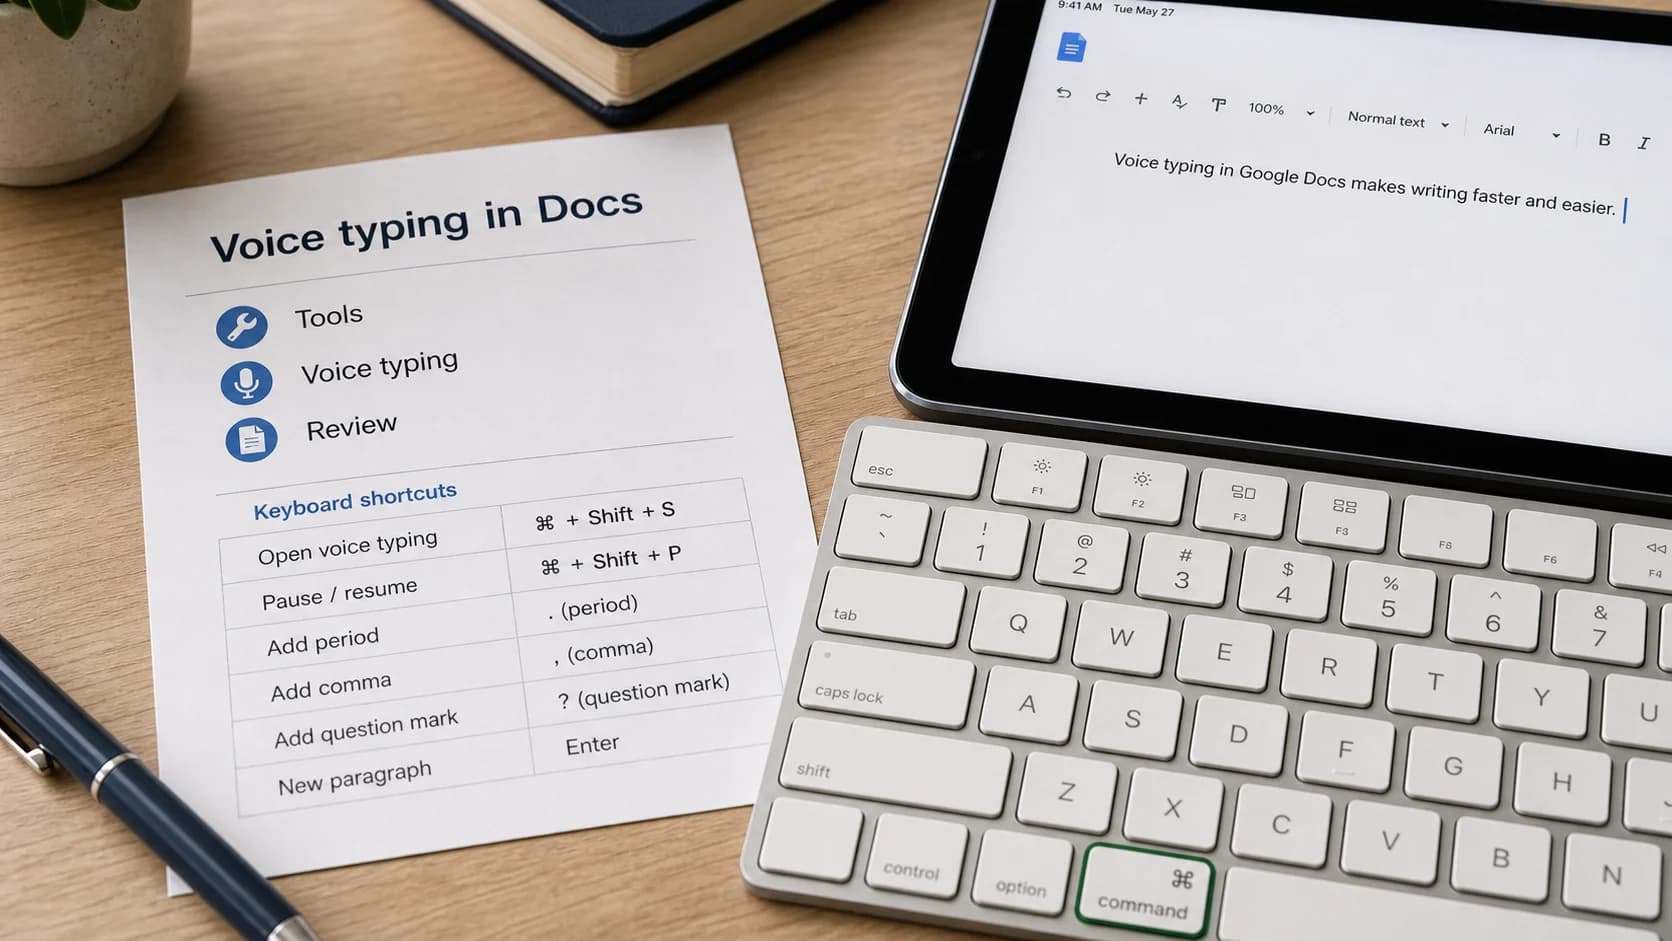
Google Docs Voice Typing is the right first step if you want a free way to dictate directly into a Google Doc. Open a document in a supported desktop browser, choose Tools > Voice typing, click the microphone, and speak.
The honest limit is scope: Google Docs Voice Typing is a browser feature for Docs and Google Slides speaker notes. It is not a system-wide Mac dictation workflow. If you only write inside Google Docs, the built-in tool may be enough. If you move between Docs, email, chat, browser forms, code editors, and private drafts, a Mac-wide tool is usually the cleaner setup.
Google Docs Voice Typing At a Glance
Google's current help page says voice typing works in the latest versions of Chrome, Edge, and Safari. It also says the browser controls the speech-to-text service and sends the resulting text to Google Docs or Google Slides. That means browser support and browser microphone permissions matter.
| Question | Practical answer |
|---|---|
| Where does it work? | Google Docs documents and Google Slides speaker notes. |
| Which browsers? | Latest Chrome, Edge, and Safari, according to Google Help. |
| Is it free? | Yes. It is built into Google Docs. |
| Is it system-wide? | No. It is scoped to supported Google Docs and Slides surfaces. |
| Does it replace Mac dictation? | Not if you need voice input across multiple Mac apps. |
| Best fit | Quick Docs drafts, school assignments, simple notes, and browser-based writing. |
How to Turn On Google Docs Voice Typing
- Open Google Docs in a supported desktop browser.
- Open the document where you want to dictate.
- Click Tools > Voice typing.
- Click the microphone box that appears.
- Allow microphone access if your browser asks.
- Speak clearly at a normal volume and pace.
- Click the microphone again when you are done.
If you are using a work or school Google account, your administrator can disable the feature. If the menu item is missing, first try the latest version of Chrome, Edge, or Safari, then check whether browser microphone permission is blocked.
Browser-Only Limits to Know
Google Docs Voice Typing is useful because there is nothing to install. It is also limited because it lives inside a browser tab.
Use it when:
- You are drafting directly in Google Docs.
- You need a free tool for occasional dictation.
- You are writing in a quiet room with a working microphone.
- Your workflow stays inside Docs or Slides speaker notes.
Consider a system-wide Mac workflow when:
- You dictate in email, Slack, Notion, web forms, IDEs, or other editors.
- You draft in Docs but finish or publish somewhere else.
- You want one shortcut that works across normal Mac text fields.
- You need local Mac modes for private writing where supported.
- You are tired of switching browser tabs just to use voice input.
For the Mac baseline, read how to do speech to text on Mac. If you are comparing dedicated tools, start with the best dictation app for Mac guide.
Commands and Punctuation
For basic dictation, you say punctuation out loud:
- Period
- Comma
- Question mark
- Exclamation point
- New line
- New paragraph
For example, say:
The draft is ready comma but I want one more editing pass period new paragraph
Google also documents voice commands for selecting text, formatting text, editing, moving around the document, and working with tables. The important caveat is language support: Google says voice commands are available only in English, and your account language and document language both need to be English. Google also says voice commands are not available in Slides speaker notes.
If punctuation words are being typed as literal text, check the Voice Typing language dropdown and the document language. A language mismatch is one of the fastest ways to make commands feel broken.
A Simple Workflow Test
Before deciding whether Google Docs Voice Typing is enough, test it against the way you actually write.
| Test | What to try | What it tells you |
|---|---|---|
| Docs draft | Dictate 300 words into a Google Doc. | Whether free browser dictation is accurate enough. |
| Slides speaker notes | Dictate speaker notes in Google Slides. | Whether the Google surface you need is supported. |
| Move the draft elsewhere | Paste the draft into email, a CMS, Slack, or another editor. | Whether browser-only dictation slows the real workflow. |
| Correction pass | Fix names, jargon, punctuation, and paragraph breaks. | Whether dictation saved time after cleanup. |
| Cross-app day | Try to dictate every writing task for one work block. | Whether you need system-wide Mac dictation instead. |
If the first two tests are smooth and you mostly live in Google Docs, stay with the free tool. If the friction appears when you leave Docs, the problem is not Google Docs Voice Typing itself - it is that your workflow is broader than one browser feature.
How to Improve Accuracy
Most Google Docs Voice Typing problems start with audio quality, permissions, or environment.
Try these fixes first:
- Use a quiet room.
- Use a headset or external microphone if your laptop mic is noisy.
- Keep your mouth a consistent distance from the mic.
- Speak at a normal pace instead of rushing.
- Check browser microphone permission.
- Make sure no other app is using the microphone.
- Restart the browser if the microphone box stops responding.
Google's own troubleshooting guidance also recommends moving to a quiet room, using an external microphone, and checking system microphone settings when Docs has trouble hearing you.
Google Docs Voice Typing vs System-Wide Mac Dictation
The decision is not "Google Docs versus Paraspeech" for everyone. For many users, Google Docs Voice Typing is exactly the right free feature.
| Choose Google Docs Voice Typing if... | Choose system-wide Mac dictation if... |
|---|---|
| You only need to dictate inside Google Docs. | You write across multiple Mac apps. |
| You want the fastest free setup. | You want one shortcut for Docs, email, chat, and editors. |
| You are fine using a supported browser. | Browser support keeps getting in the way. |
| You mostly draft short documents. | You dictate long drafts or writing-heavy work sessions. |
| You do not need local Mac processing modes. | You want local Mac modes where your hardware supports them. |
Paraspeech is built for Mac users who want voice input across normal writing surfaces, not only inside a Google Docs tab. In local Mac modes, audio and text stay on your Mac. Cloud processing is explicit and account-dependent. Local speech recognition is available on supported Apple Silicon Macs; Intel Macs are supported with cloud-backed models on subscription.
If local processing is the main reason you are looking beyond Google Docs, read the offline speech-to-text Mac guide. To try the Mac app, go to download. To compare plan fit, see pricing.
Troubleshooting Common Problems
Why can't I find Voice Typing in Google Docs?
Check your browser first. Google currently documents support for the latest versions of Chrome, Edge, and Safari. If the option is missing, update your browser, try one of those supported browsers, and confirm your organization has not disabled the feature.
Why is the microphone not working?
Check browser microphone permission, then check your Mac or PC microphone settings. Also make sure another app is not already using the mic.
Can I use Google Docs Voice Typing on my phone?
Mobile dictation usually comes from the phone keyboard, not the desktop Google Docs Voice Typing menu. On iPhone or Android, tap into the document and use the microphone key on the system keyboard if it is available.
Can I use voice typing in Google Slides?
Yes, but the supported workflow is speaker notes and captions, not arbitrary text input everywhere in Slides. Google also says voice commands are not available in Slides speaker notes.
Is Google Docs Voice Typing private?
Google's documentation says your browser controls the speech-to-text service and sends the resulting text to Google Docs or Google Slides. Do not assume it is a local-only Mac workflow. If you need a local Mac mode, use a tool that explicitly supports one and check the hardware requirements.
Bottom Line
Use Google Docs Voice Typing if you want a free, browser-based way to dictate into Docs or Slides speaker notes. It is a good support feature for quick drafts.
Move to system-wide Mac dictation when the real work happens across apps. Paraspeech is one option for that Mac-wide workflow, with local Mac modes where supported and explicit cloud-backed modes when selected.
Download Paraspeech for Mac if you want to test a system-wide dictation setup next to Google Docs Voice Typing.